Sunday 27 September 2009

Getting the resolution correct when placing your image on reference plate

Some of you will have trouble with your image looking very pixellated when you load it onto the reference plates. The problem is that the resolution is incorrect.
What you need to do is go to:

Customise > Prefererences > Viewport tab > Configure driver > and then you need to check Match Bitmap (this is offered twice so check both ). You then have to close down Max and reboot.


Monday 21 September 2009

3 - Building of 3D Reference Plates

3 - Building of 3D Reference Plates
Eric Maslowski


Create > tab > geometry > plane. Create plane that will hold the front view of the image.

Set up units of scale. Click and drag plane in view port.

Modify panel > change the length and width segments down to 1.

Position plane – in top view port. We created plane at 0, but the plane needs to be positioned behind what we are modelling. Click and drag plane to the side and move back and over to the left.

Create material that will hold the photos
Material editor> select material slot and assign to diffuse channel > bitmap > ok Find our topology file which is a PSD file. Open as this is a Photoshop file, we can collapse all layers or individual layer. Use collapsed layers if you have several layers in the image.

Click and drag image on to the plane. You will notice that the map doesn’t show up, which is default behaviour in Max, in order to see the texture go to the blue and white chequered box, click to see image.
The image looks severely squashed; we need to maintain the same aspect ratio. To do this we need to modify texture co ordinates through the modify panel > UVW map > to modify the texture co-ordinates for the plane. We could decrease the U tile amount but not precise enough, so use a tool called ‘bitmap fit’ under ‘alignment’ in the modify panel.

On the modify panel where you see UVW mapping in the stack, click on the plus sign – this reveals a gismo, this can move rotate or scale image it is applied to. Move tool, click on x axis and move to fit the face on to the plane properly.

As you rotate image around it gets darker. We want to see the reference plane clearly behind the object.
The Material editor is hierarchal, when assigning a map you are assigning a child, so need to ‘go to parent’, back to bitmap, need to remove lighting by self illuminating the material. In the self illumination panel change the illumination to 100. Close material editor.

Copy our existing object. We need to tweak to show the left side. Switch to rotate shift click and drag it makes a copy to 90 degrees. Press A on key board which is angle snap if you are having trouble.
Move to new location set up left plane. You will notice that the image is facing the wrong direction and the plane isn’t big enough to hold profile image.

Therefore we need to flip the image – flip is next to UV tile.
In order to add space to accommodate the entire side of the head to left and right – jump back to plane increase the width to whatever is needed.
Tweek the UV mapping gismo and adjust further. Now we have two nicely positioned reference planes.

Select one ref planes – right click freeze selection the panel turns grey. You need to modify the behaviour of the plane. Therefore left click > properties – Check freeze then uncheck ‘show frozen in grey’ this preserves the appearance of the object. Do the same to the profile view.

2 - Defining topology lines on reference images

2 - Defining topology lines on reference images
Eric Maslowski


Topology is the flow of surfaces over an environment or object.
We want to break the face in to key areas. What is meant by key areas?
If you look at an anatomy drawing, you can see how the muscles flow round key features, so our edge loops should have a similar flow to those muscles.

If you looking at a simple shape, such as a plane with a line bisecting it, if you drag the vertices up the shape will crease. If you move that bisecting line you get a different surface. This shows how edges play a role. We want and edge wherever we want a crease or protrusion in the surface that we need to control.

On your image, add edges at the wrinkles. Create a new layer, chose a bright colour, brush size 3, start drawing in certain areas, just to define the basic areas where there is a large crease or wrinkle or protrusion.
Just go through and try to isolate all the key areas.

Around eyes, eyebrows, crow’s feet bridge of nose, tip of nose, cheek bone. The cheek bone needs a lot of control as it gives definition to the face. Also make sure that you draw in the indentation under cheek bone and nasal folds. Think about how these join up. And draw in the topology. This is a good planning stage until we start modelling the character.

Now choose a new colour zoom in and have a smaller brush size and start tracing lines and placing quads. This gives flexibility, subdivision algorithms depend on quads and when you subdivide you get no pinching effects – if there is a triangle you will get pinching which is difficult to get rid off.

First stage is definition of eye and nose and side of nostrils. Place a small set of quads in between the nasal folds which gives flexibility later on when modelling for expression.

Add the cheek, and nose. You may get a direction changing quad, which can continue down the cheek or round the eye so topology can flow in any direction needed.

Chin area and side of mouth. Smile line on mouth is important so dimples can be added or puffy cheeks.

Forehead and upper lip edge flow from the cheek bone, try to approach the upper lip vertically. All muscles coming out of the lip are coming up vertically.
Nose – it can be difficult to see how this area can be broken into quads, try to avoid triangles. Think how surface should flow.

Sit back and think about your approach. If you create another layer and play around with your quad building you will become more aware of the process.

Now plot guidelines on the side image. Put on layers that you can toggle these on and off.

1 - Preparing Photos to use as reference plates in Photoshop

1 - Preparing photos to use as reference plates in Photoshop CS2
Eric Maslowski

You will need two images of a face, a front view and a side view – ‘3D Data SK’ is an on-line resource which has hundreds of reference photos which can be used rather than having to take your own photographs.

You need to remove any distortion introduced by the lens, camera or photographer – the lens causes barrel distortion, so you need to remove this distortion to produce a flat image.

Lens Distortion is a filter. Go to Filter > Distort >Lens correction.
Tweek the ‘Remove distortion’ slider, which is similar to the spherize filter in previous versions of Photoshop, you can also use vertical perspective or rotate the image.

To use the ‘Straightening tool’ click and drag between two areas that are horizontal. Then release left mouse button and the image straightens up.

Select – filter > distort > lens correction. 
Look at symmetry of the image, so make sure that the person is fairly symmetrical. Unfortunately most people are asymmetrical naturally so you need to look at markers which may imply that the lens has tilted the image. Look at the position of pupils, ear lobes, nostrils and edges of the mouth.
Click on the ‘Straighten’ tool and drag between these different areas to see if the image is straight.
Using the ‘Remove distortion’ slider, slide back until fisheye effect is removed. The image flattens out.

Do the same for the side image.

Merge the two images together and make sure the key features line up.
This gives you two points of reference when modelling later.

Control A, Control C, then Control V to paste the image and move it to the side.
Go to ‘Image canvas size’ and extend canvas 200% to the right.

Take layer one and set opacity to 60-70 % so you can see the face behind it. Pick common points for lining up such as the side of eye or mouth. ‘Control T’ will put you into free transform mode, rotate the image slightly, move the centre to your reference point, so can line up all ref points at same time.

Return opacity to 100% and the clear up background with the eraser tool.
Double check results by using guide lines – rulers, click and drag guide lines to the centre of the pupils, under nose, through mouth and under ears or the top of the ears or eyebrows and you can then see how well you are lined up.

Crop the image
Save as Jpeg.

When using the lens distortion if you have complete control ptlens plug in which removes barrel distortion.

Welcome to Virtual Environments - The brief

The Brief


Build your own face  (Weeks 1 – 5)

You are to build a 3D version of your own face and head using spline modelling from the tutorials specified.


http://cg-india.com/tutorials/3dsmax_tutorials_organic_modeling.html


A transcription of these tutorials can be found in the Virtual Environments blog: http://virtenv.blogspot.com/


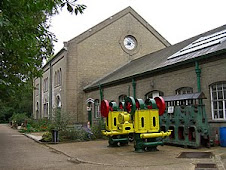
The Museum of Power (Weeks 5 – 12)


The Museum of Power based at Langford in Maldon, Essex, has been developed around a steam pumping station, and houses a unique collection of power sources, working examples of machines and tools, which have been used to shape industry and the social conditions of this country.


Terry Bradley is one of the voluntary trustees of The Museum of Power. Terry and his enthusiastic team are interested in updating the image of the museum, and would like Anglia Ruskin students to provide animations to support the different attractions offered.


You are therefore to investigate the museum, and identify a steam engine or tool to model and animate to show the general public how it works/would have worked, and what it was originally used for.

There is a strong educational theme running through this brief, as the information has to be relevant to a mixed audience of all ages. The museum is visited by schools, engineers, volunteers, and keen steam engine enthusiasts, therefore the information provided in the animations needs to be factual and accurate.


What needs to be handed in at the end of the module?


On the Module Definition Form the assessment method is Portfolio to include an animation product.


Therefore you need to include the following as part of your portfolio. I would suggest that you place these in a folder with the following sections:


  1. Evidence of modelling and animation – This will be evidence of your own contribution from weeks 1-12 – usually as a print out of your own blog. As this will take the place of your report, the blog should be written in detail. You should include a disc of your 3DS Max work .


  1. Evidence of group work and interaction – Please print out your postings from the group blog site such as any minutes of meetings that were taken by the group, roles within the group etc. You should include a copy of the group animation (please use a format that can be played on an Apple Mac, so not Windows based.) and any other relevant materials to the project.


How will this module be assessed?


Face Modelling Exercise:

Elements marked will be:

o   How far you have managed to progress with this exercise in five weeks Efficiency and standard of model preparation – how well have you defined the topology.

o   Standard of modelling – Have the quads been arranged successfully with no puckering? Are there breaks in the mesh? Etc.

o   Standard of map preparation and application.


Group project:

Elements marked will be:

o   Standard of modelling and animation

o   Evidence of new skills acquired

o   How well you have contributed to the team

o   Standard of organisation and professionalism

o   How well your piece of work was received by the client